Urban Realm Article: The use of 3D CAD Models in the Planning System
Joanna James recently featured in Urban Realm Article.
Digital Architectural 3D Models demonstrate the relationship between existing context and proposed developments.
Urban Realm explore within the article if now is the time for wider adoption of 3D models within the planning process.
Behind the Scenes: Photorealistic 3D Rendering in 7 Steps

Behind the Scenes: Photorealistic 3D Rendering in 7 Steps 3D rendering and visualisation has immeasurably helped architects, planners, developers & their clients gain greater understanding of a projects outcomes prior to full financial commitment. Qualified designers use software like 3Ds Max, ZBrush, Rhino, SketchUp in such a way that one rarely can tell if image is actually real. So, when you see a render that boasts such superb photorealistic quality, you may start to wonder what it takes to create one. From planning to final strokes, we’re happy to show you behind the Scenes: Photorealistic 3D Rendering in 7 Steps of what goes into the creation of a static architectural CGI visualisation . Step 1. Understanding the Challenge & Finding Solution The first step is always for us to listen you and your ideas. We focus on client’s needs and requirements & understanding business challenges, including budgets. Listening & understanding allows to tailor solutions specifically with your project in mind. Step 2. Define Your Aim The client defines what the main focus of static architectural visualisation will be. It always depends on your aim: for example, your company designs luxury apartments and you would like to get a external 3D rendering . The accent will be on the apartment building, while other external elements and angles will highlight style and shape the best way possible. Our CGI artists make thorough research to help you polish the concept of the photorealistic render, from building materials to street furniture and light sources. Step 3. Planning the Scene Your idea starts to become reality. In order to create static architectural visualisation with elements of 3D modelling, we start from a 2D plan which shows a scheme in situ. It includes all the main details like objects in the room, door and/or window and so on. On the plan you see either the exact angle of 3D rendering image or view from above. Step 4. Setting the 3D Structure Now we switch into 3D for the first time! The task on this stage is to draw a “scenery model” for future 3D rendering. The structure created by our specialists will show the room as it is – with walls, windows, doors, furniture. The basics are now complete, let’s add more detail. Step 5. Accessories Design, Texture & Lightning 3D modeling of furniture and other objects, as well as drawing their structure happens on this step. Internal renders finally see armchairs, sofas , lamps, floor, walls in photorealistic quality – it requires attentive work of our designers. But what element lifts the level of realism to maximum? Light! As creating a CGI is very close to art, it’s no surprise that we use the trick pioneered by Leonardo da Vinci and Michelangelo – adding up-light to enliven the image. Step 6. Angle & Day Time The render already looks almost true-to-life, but the devil is in the detail: the key to perfect static architectural visualisation is getting the right angle. It allows you to draw attention to the area or object you’d like to accentuate. As for the day time, it is crucial for previous step – whether it’s day, night or something in the middle, it affects the illumination and level of “realness” on the 3D rendered image. Step 7. Final Tuning and Rendering It’s time to polish the CGI visualisation rendering that is almost complete. We conduct the final step in Photoshop: here our designers add reflection, glossiness and other elements that enhance a photorealistic quality render from less detailed one. The result is always worth the effort – an aesthetically pleasant and top-quality picture ready to be shown to clients, planners or wider audiences on your website, catalogue or social media. OUTCOMES We start with the aim of working with clients repeatedly over the long term. We believe providing an accessible, friendly, professional and cost effective, high quality CGI Visualisation helps us achieve this goal. We are always open to your ideas and are ready to offer creative solutions for your business, be it interior/exterior visualisation, an amazing VR Tour around property, marketing video. Feel free to contact us if you feel you need a CGI studio with top-quality service and competitive prices. Contact Us >
3D Model of London in ESRI ArcGIS
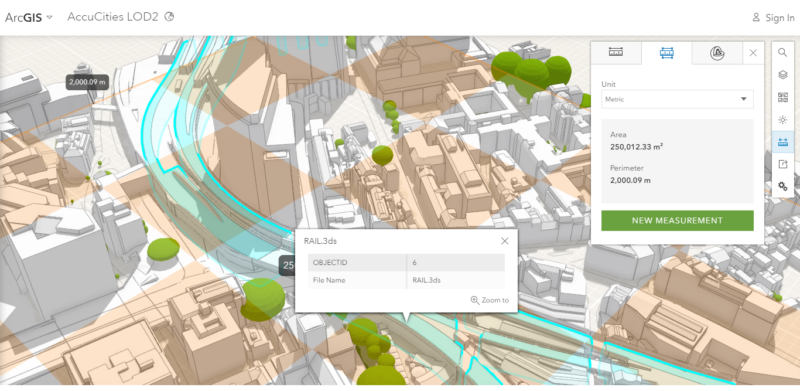
https://joanna-james.com/wp-content/uploads/2020/02/3D-city-models-esri.mp4 FREE SAMPLE – BRISTOL 3D MODEL ESRI ArcGIS allows us to create web scenes to view 3D Model of London online. Level 2 + 3 models from Joanna James have been designed from day one to be platform neutral. Customers usually require 3D data in AutoCad, 3Ds Max, C4D or SketchUp formats, but often they just want to analyse the dataset. ArcGIS is a platform to create, manage, analyse & share spatial data. Using the 3D Model of London in ArcGIS means that its smart, data-driven styles and intuitive analysis tools can deliver valuable location intelligence. Dominic Saunders from ESRI UK imported the Free 3D London Sample into four scenes. You can view these scenes in ArcGIS Viewer by following the links below. COMPARE 3D MODELS OF LONDON Scene 1 positions Level 2 (Medium Detail) and Level 3 (High Detail) 3D models side by side for a direct comparison of 3D Model of London in ESRI ArcGIS. DIRECT COMPARISON Scene 2 has Level 2 + 3 samples on top of each other for a direct comparison between Medium and High level of detail models. ArcGIS TOOLSET Scene 3 has standalone Level 3 sample and Scene 4 has Level 2 model. These scenes are most likely the ones you want to use when exploring the potential of ArcGIS toolset. Measure distances, slice entire model or only its layers or run a shadow analyses for any time of any day of the year. FREE SAMPLES AND QUOTES ArcGIS is an excellent platform to analyse 3D city model data. Using the 3D Model of London in ArcGIS offers great analysis tools, able to deliver valuable planning intelligence. Need CAD, FBX or SKP files? Download Free 3D London Samples or send us a Quote Request for a Custom 3D Context model – available anywhere in the UK.
Which 3D Model for you project?

“Which 3D Model?” 3 Levels of Detail.Which one suits your project? Level 1 – Low Detail – Ordnance Survey Massing Model We call it the “shoebox” – but what it lacks in accuracy it more than makes up for helping people who want something quick and easy at site assessment and pre-application stage. Simple & therefore inexpensive Level 1 3D models are made from Ordnance Survey Mastermap. Building footprint polygons are extruded to average building height creating a cubed mass. OS MasterMap + OS Terrain 5 included with every purchase. Learn more Level 2 – Medium Detail Excellent for larger sites where detail high detail isn’t required. Level 2 models are less expensive and less detailed/accurate than Level 3 models. They use the latest captured High-Res imagery & are accurate to 50cm xyz. Consequently the 3D Model is very light and low poly. Buildings are captured with correct roof shapes of main structures but detail is less – check the roof tops on the image above compared with Level 3! Learn more Level 3 – High Detail – Most Popular & Most Accurate Model The best there is for showing the relationship between proposal & context to both planners & clients alike. Level 3 high detail 3D Models are accurate to 15cm. Buildings are captured with correct roof shapes and all features such as chimneys, parapet walls or dormer windows. Easily our most popular 3D Model. Learn more